Using Azure Functions with Python, a quick intro with a Blobtrigger
by Silas Stulz
Overview
Lately, I worked a lot with the Azure Cloud. Overall I have to say Azure offers a lot but is still not on the same level as its hardest competitors (AWS, Google). One thing that caught my eye is the compatibility of certain programming languages. Azure supports a few different languages (C#, JavaScript, Java, Python, etc.) but the supported features for these languages differ a lot. I think Azure Cloud is really great for coding with C# (although I never tried) but there is a lack of features for Python.
If we look at Azure Functions (serverless computing like AWS Lambda) we see that there is no support for editing functions in the portal with Python, we have to use the CLI. Also, there is quite a lack of documentation for different scenarios (Blobtrigger, etc.) using Python (Feb. 2020). So with this post, I want to save you some time, if you want to implement a Python function (with a blobtrigger) on the Azure Cloud and hopefully, you can learn from my errors.
A blobtrigger function listens to an Azure BlobStorage and is activated every time a new file is added or updated.
1. Set up local environment
I expect you to have Python (3.6 or 3.7; 3.8 is not yet supported) installed.
Azure Function Core Tools
First, we need the Azure Function Core Tools. On macOS we can easily install it with homebrew:
brew tap azure/functions
brew install azure-functions-core-tools
For Windows you need node installed, refer to https://docs.microsoft.com/en-us/azure/azure-functions/functions-run-local?tabs=windows%2Ccsharp%2Cbash#install-the-azure-functions-core-tools
Azure CLI
Additionally, we need the Azure CLI installed. Again using homebrew:
brew update && brew install azure-cliFor Windows using PowerShell in Administrator mode:
Invoke-WebRequest -Uri https://aka.ms/installazurecliwindows -OutFile .\AzureCLI.msi; Start-Process msiexec.exe -Wait -ArgumentList '/I AzureCLI.msi /quiet'To verify that the installation was successful:
az --versionContinue to login:
az loginA browser window will pop up and you should now login with your Azure account.
Virtualenv
To not mess up your system python environment, let's use virtualenv. You will need this environment if you want to develop your function further.
Create the env:
python -m venv azure_functionsActivate the env:
source azure_function/bin/activateLocal function project
Now you can create a local function project. A function project is a container for one or more functions which all share the same configuration.
To create a function project:
func init BlogFunctionTest --pythonNavigate into the folder:
cd BlogFunctionTestNow you can create the actual function in the project, let’s use the blob trigger template.
func new --name BlobTriggerTestPython --template AzureBlobStorageTriggerNow this will create a new folder. The most important files are __init__.py and function.json. Let’s have a quick look at both. Change your files to look like the following:
def main(myblob: func.InputStream):
  logging.info(f"Python blob trigger function processed blob \n"
                f"Name: {myblob.name}\n"
                f"Blob Size: {myblob.length} bytes")

  file = myblob.read()
This file is the default starting point for your function. You can read your blob file with .read()
A full reference to the func.InputStream can be found here: https://docs.microsoft.com/en-us/python/api/azure-functions/azure.functions.inputstream?view=azure-python
{
    "scriptFile": "__init__.py",
    "bindings": [
    {
        "name": "myblob",
        "type": "blobTrigger",
        "direction": "in",
        "path": "data/{name}",
        "connection": "MyStorageConnectionString"
    }
  ]
}
This is basically the configuration file for your function.
scriptFileallows you to invoke another Python file.typedefines the type of the triggerdirectiondefines if its an inward or outward trigger (in/out)paththis option defines the path for the blob storage where we are listening to. Currently, we are listening to all new files created in the blob storage path “data/”.connectionthis is a ConnectionString that defines the connection to your blob storage. You will define this String as an environmental variable later on.
2. Create an Azure Function App
Now that you have set up your local environment, you need to create a new Function App on Azure. You can either do this using the web client (portal.azure.com) or via CLI. I will only go through the CLI process because I think the Web Client way is self-explanatory. Everything you create here, you can also create with the help of the Web Client and you should get the same results.
2.1 Make sure you are logged in:
az login


2.2 You can switch subscriptions with:

```bash
az account set --subscription <SUBSCRIPTION_ID>
If you don’t know your subscription ids:
az account list2.3 Create a resource group named PythonTriggerTest in the west Europe region (or any region you like).
az group create --name PythonTriggerTest --location westeurope2.4 You need to create a general-purpose storage account in your resource group and region. The Function App needs this storage to maintain state and other information about your projects. The Storage name has to be globally unique. Also, you will use this storage account as your blob storage.
az storage account create --name <STORAGE_NAME> --location westeurope --resource-group PythonTriggerTest --sku Standard_LRS2.5 After that, create the Functions app, replace <STORAGE_NAME> with the chosen Storage name in the step before and choose a globally unique App name for <APP_NAME>.
az functionapp create --resource-group PythonTriggerTest --os-type Linux --consumption-plan-location westeurope --runtime python --runtime-version 3.6 --name <APP_NAME> --storage-account <STORAGE_NAME>3. Create a blob storage container
Now it’s time to create a BlobStorage Container where you will be able to save your files, which you want to trigger your function from.
Again you can do that directly through the CLI.
Where <storage-account> is the account you just created in step 2.
az storage container create \
--account-name <storage-account> \
--name data \
--auth-mode login
4. Pulling the strings together
Now that you created every resource needed, it is time to publish your function to Azure. <APP_NAME> is the globally unique name you set in step 2.5. Make sure you are inside your created function.
func azure functionapp publish <APP_NAME> --pythonIf you get an error about a missing requirements.txt file. Just make sure you are in the right folder inside BlobFunctionTest and not inside BlogTriggerTestPython.
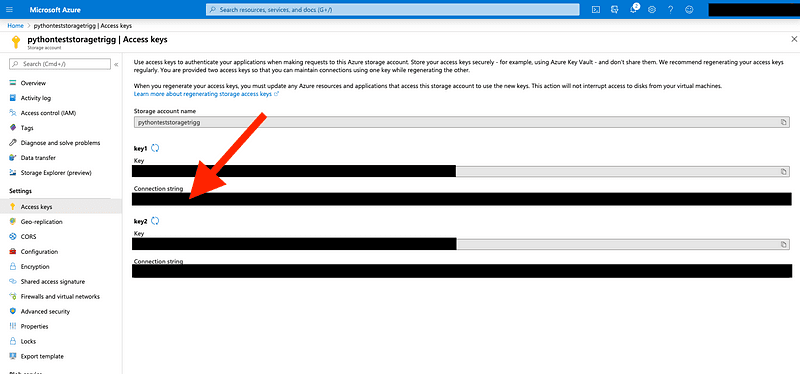
Connecting Azure Function and Storage As the last step, you have to give your Azure Function access to the Storage Account. To do that, go to https://portal.azure.com and navigate to your storage account you previously created in this tutorial. Go to “Access keys” and copy the key1 Connection string.
Now navigate to your Azure Function App, and go to configuration. There create a new Application setting and paste the key you just copied as the value. Name: “MyStorageConnectionString” value: <CONNECTION_STRING>
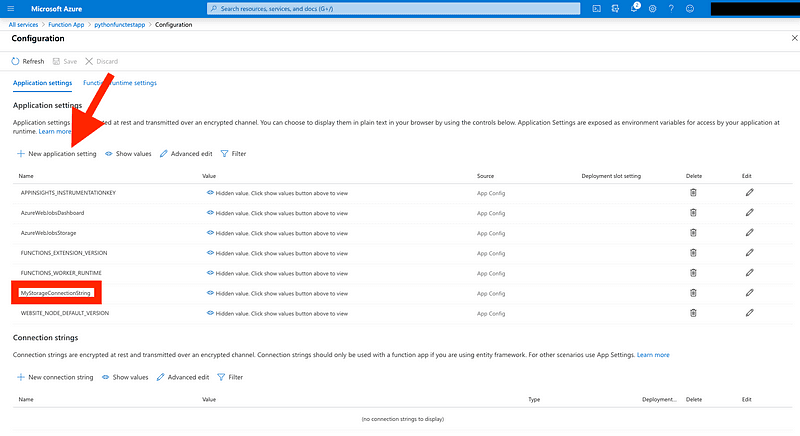
Don’t forget to click save. The Function App will now restart and the key will be available to your function as an environment variable.
5. Run it
To test the trigger you just built, upload a file to your blob storage:
Upload any file you want or just create a new one:
touch helloworld
echo 'Hello World!' > helloworld
az storage blob upload \
--account-name <storage-account> \
--container-name data \
--name <filename> \
--file <filename> \
--auth-mode login
If you have problems with the authentication, another way is to use auth-mode key.
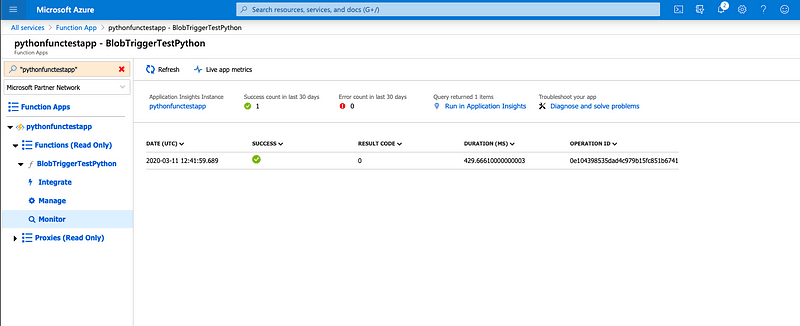
After you uploaded your file, you can open a browser head to the Azure portal, navigate to your Function app and open Functions → BlobTriggerTestPython → Monitor. If you have done everything correctly you will see a successful run (It can take up to 5 minutes to show the run).
6. Clean up and conclusion
If you do not want to keep what you just built you can easily delete everything.
To avoid further costs, delete the resource group and all associated resources.
az group delete --name PythonTriggerTest7. Side notes
There is quite a restrictive import management in place for python azure functions. To save you some time, have a look at: https://docs.microsoft.com/en-us/azure/azure-functions/functions-reference-python#import-behavior